The Sticky Matter of Sealing Wax

The time has come,’ the Walrus said,. To talk of many things: Of shoes — and ships — and sealing-wax —. Of cabbages — and kings—
Lewis Carroll
In the days before gummed envelopes sealing letters and documents was a tricky business. Sealing wafers, sealing wax, and even ribbons were often used for the purpose. Seals pressed into the hot wax could provide proof of the sender’s identity and indicate if any tampering had occurred. For official and important documents, ribbons would be woven through slits in a document and sealed in place with wax seals, sometimes with multiple seals, giving even greater security.
Fun side note: Red ribbons were used to seal and bundle official government documents together, hence the original of the modern term “red tape”.
Sealing Etiquette
As with many things in Regency life, sealing letters was governed by an etiquette that is difficult to imagine today.
The Complete Letter Writer suggests:
Letters should be wrote on Quarto fine gilt post paper to superiors; if to your equals or inferiors, you are at your own option to use what sort or size you please, but take care never to seal your letter with a wafer unless to the latter.
Since wafers were quick and easy to use, they gave a letter an appearance of being hurried, even messy, compared to the use of a wax seal. When Nelson penned the letters that ended the Battle of Copenhagen in 1801, he used a wax seal to prove he was in no hurry, lest there be a suggestion of fear or apprehension in his correspondence.
Wafer Seals

Wafer seals were less expensive and easier to use than wax seals since they required no special equipment for use. Generally made from a wheat flour paste that had been pressed into thin disks and heated to harden, wafers were the precursor of today’s stickers. Wafers could be left white, but they were often colored with lampblack, gamboge (yellow), indigo (blue), vermilion (red), and red lead. This might have been a way of making them look a bit more formal (or expensive) that plan flour wafers. They might even be pressed with a seal to help them stick.
Wafers would be moistened—even licked—to make the soft and sticky for use. The latter is one reason wafers were informal and inappropriate for correspondence with one’s superiors.
Wafers were also used to stick papers together, or even to a wall, much like we use tape today. Craft books suggest using them for making decorative rosettes to decorate baskets. Books of home remedies recommend their use to remove corns on the feet, but sticking them to the site of the problem.
The New Family Receipt book gives directions for making one’s own wafers.
105. To make Wafers. Take very fine flour, mix it with the glair (or whites) of eggs, isinglass, and a little yeast; mingle the materials, beat them well together, spread the batter, being made thin with gum water, on even tin plates, and dry them in a stove; then cut them for use. You may make them of what colour you please, by tinging the paste with Brazil or vermillion for red; indigo or verditer, & c. for blue; saffron, turmeric, or gamboge, & c. for yellow.
The process was also conducted on a commercial scale, described by Griffiths (1844)
The workman suddenly presses a portion of this between two flat and polished iron plates, jointed together like a pair of lemon squeezers, called “wafer – tongs; “he then holds it, thus flattened, over a glowing fire for a few seconds to “set the paste; “and afterwards, upon separating the tongs, a sheet of polished white wafer falls out, about four times the size of this printed page. Several sheets being thus made, they are laid upon each other like the pages of this book; and then the workman, with a long hollow punch, something like a gun punch, used by sportsmen for punching wadding, cuts them all through at once, into as many round pieces as there are square sheets. He next applies the punch to another part of the sheets, and cuts as many more, and so continues until every part of them is made into wafers, with as little waste as possible.
More formal correspondence required sealing wax.
Sealing Wax
The practice of embossing an image into seals to secure goods and communications can be found as back as the seventh millennium BC. Various substances including clay, resins, bitumen, and even beeswax were used for seals. Sealing wax came into its own with the invention of paper.
Initially plain wax, even candle wax was used to seal letters for the post as it was readily available to households. However, as the postal system developed, many in the system opened and read mail, especially government mail, since the wax was easy to remove and reapply. A more tamper resistant material was necessary.

By the end of the seventeenth century, varnish-makers sold sealing wax to the general public. Each maker had their own special formula which could include beeswax, rosin, olive oil, turpentine, shellac, pitch, sandarac, resin, mastic, essential oils and fragrant balsams.
Good quality sealing produced smooth, glossy seals with deep clear color.
During the regency only three colors of sealing wax were available, red, the most commonly used color, green used by the Office of the Exchequer, the courts, and the Church and not available to the general public, and black used for mourning and letters announcing a death.
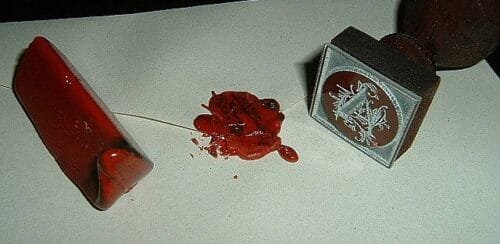
Consumers bought sealing wax in stick form, seven to eight inches long and about an inch thick. To use them, one held one end of the stick above a flame, usually from a candle, to soften the wax. The softened wax would be pressed against a folded letter, then twisted away. While the wax was still warm, a seal would be pressed into the wax.
Heating the wax, though, was a challenging process. If the flame was too hot, the sealing wax would scorch. If the flame was smokey, it could discolor the sealing wax. Not to mention, candles were expensive.
A wax-jack could make the process easier. This contraption held a wax-coated wick around a spindle. These tapers burned with small, clean, steady flames, perfect for melting sealing wax. Manufacturers often produce wax-jacks in matching sets with ink stands, pounce boxes and pen holders.
Seals
The seals themselves were made of a variety of materials and took many forms. Coats of arms, initials, merchant’s marks or personal symbols were all commonly used on seals.
Fob seals might be attached to a man’s pocket watch, serving dual purpose as decoration and function. Signet rings for both men and women did the same. Standard letter seals were larger, complete with a handle, and often stood on a desk, part of the decorative accessories that merged form and function for the Regency Era letter-writer.
References
Formichella, Janice. Letter seals: a history. Recollections November 12, 2022. Accessed August 31, 2023. https://recollections.biz/blog/letter-seals-a-history/
Griffiths, Thomas. The Writing-Desk and its Contents. John W. Parker: London. 1844.
Kane, Katheryn. Of Wax-Jacks and Bougie-Boxes. The Regency Redingote. January 13, 2013. Accessed December 12, 2022. https://regencyredingote.wordpress.com/2013/01/18/of-wax-jacks-and-bougie-boxes/
Kane, Katheryn. Sealing…Wax? The Regency Redingote. November 16, 2012. Accessed December 12, 2022. https://regencyredingote.wordpress.com/2012/11/16/sealing-wax/
Kratz, Jessie. Holding It Together: A Seal—or Not? Pieces of History-National Archives, October 5, 2021. Accessed October 31, 2023. https://prologue.blogs.archives.gov/2021/10/05/holding-it-together-a-seal-or-not/
Kratz, Jessie. Holding It Together: Before Passwords—Ribbons and Seals for document Security. Pieces of History-National Archives, October 13, 2021. Accessed October 31, 2023. https://prologue.blogs.archives.gov/2021/10/14/holding-it-together-before-passwords-ribbons-and-seals-for-document-security/
The Complete Letter-Writer. W. Darling: Edinburgh. 1778.
The New Family Receipt book. Squire and Warwick: London. 1811.
Unfolding the Mysteries of Sealing Wax and Wafers. Victorina Passage. July, 2009. Accessed September 15, 2023. https://www.victorianpassage.com/2009/07/unfolding_the_mysteries_of_sea/
Wafer Etiquette. Her Reputation for Accomplishment. August 27, 20115 Accessed 11/14/2022 https://herreputationforaccomplishment.wordpress.com/2015/06/02/writing-a-running-hand/


Red Lead? Isn’t that poisonous? Imagine some poor clerk or servant who had the unfortunate job of licking the seals for the envelopes of an event or announcement. This could have been a dangerous job if there were many seals to lick or moisten.
I think it was a Seinfeld episode where George’s fiancée died from an allergic reaction when she licked the glue on the envelopes of their wedding announcement. Thanks for sharing. You always have interesting posts that give your readers a glimpse into the past.
Thanks for that very interesting information.
I was able to order a wax seal of my family’s crest on Amazon for less than $30; I gave one as a gift to my oldest son and ordered one for me as well. My kids also gave me a beautiful set of six brass seals (compass, heart, feather quill, bee, “Thank You,” tree) that screw onto a wooden handle. I have to add an extra ounce stamp when I mail them and I have to hand them to the postmistress so that they don’t put them through the machine as sealing wax can really gum up our modern postal system. 😉
I use wax seals mostly for birthday and other celebratory cards that I hand to people. I use the wax beads melted in a little brass spoon and laid in a circular wooden stand of sorts with a circle in the middle for the spoon to rest in over a tea light candle. I stir the beads with a toothpick just until thoroughly melted, pour the melted wax onto the back of the envelope (which I’ve already sealed in the usual manner) into a rough circular shape, and then press the seal into the warm wax, letting it remain there while I wipe the excess wax out of the brass spoon. Then I lift the seal and let it cool and harden before giving it the sealed card to whomever or taking it to the post office.